Puffer Dashboard
The Puffer Dashboard provides an interface for users to:
- Prepare Coral-CLI command to generate their validator registration payload
- Mint pufETH and Validator Tickets
- Register their validator
- View their validators
The Puffer Dashboard UI is subject to change as more features are added
Registering a Validator
The Puffer Dashboard supports launching both testnet and mainnet validators depending on the RPC that your wallet is connected to.
Step 1: Setup Wallet
 Follow the instructions to add the Holesky network to your wallet. If you're using mainnet, the default mainnet wallet config can be used or an RPC can be added here.
Step 2: Get Coral-CLI Command
Navigate to https://launchpad.puffer.fi/Setup to copy the Coral-CLI command.
Run the command where you installed the Coral-CLI.

- Copy the displayed command
- Edit
<PATH_TO_A_KEYSTORE_PASSWORD_FILE>and<PATH_TO_REGISTRATION_JSON>
The following example command will create a local validator keystore file in the ./etc/keys/bls_keys directory. The keystore is encrypted using the password contained in password.txt. The command will create a registration payload called registration.json.
cargo run --bin coral-cli validator keygen --guardian-threshold 1 --module-name 0x5055464645525f4d4f44554c455f300000000000000000000000000000000000 --withdrawal-credentials 0x0100000000000000000000005ee9246f01e95c08ee767029c1d18765bb1779d0 --guardian-pubkeys 0x049cc1fbaa3cffd3e4c1f935c47720d013938ccb822a9cbd20c5f09ab65ae8300e7986b6ce75e916d3b59599ece72134adf2972d06a76a8ba5f3747d356117c342 --fork-version 0x01017000 --password-file password.txt --output-file registration.json
Fetching the registration payload
If you ran the Coral-CLI on a remote server you can fetch the registration payload by substituting your information in the following command:
scp [email protected]:/path/to/coral/registration.json ~/my/local/computer/registration.json
Step 3: Mint pufETH or VTs
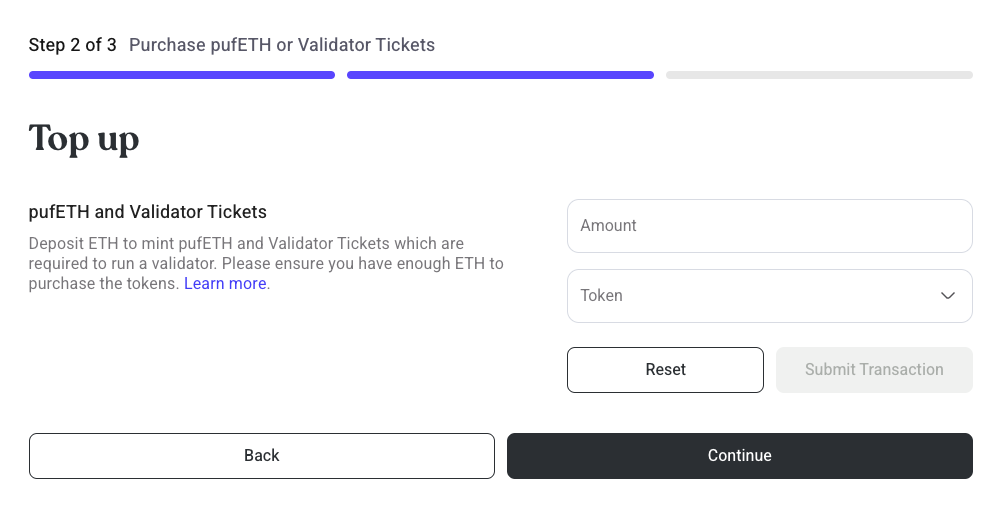
- Users must deposit 2 ETH worth of pufETH to register
- A minimum of 28 Validator Tickets (VTs) are required to be deposited when registering a validator. The Guardians will exit validators if their VTs expire after 28 days without being refilled.
Step 4: Register Validator
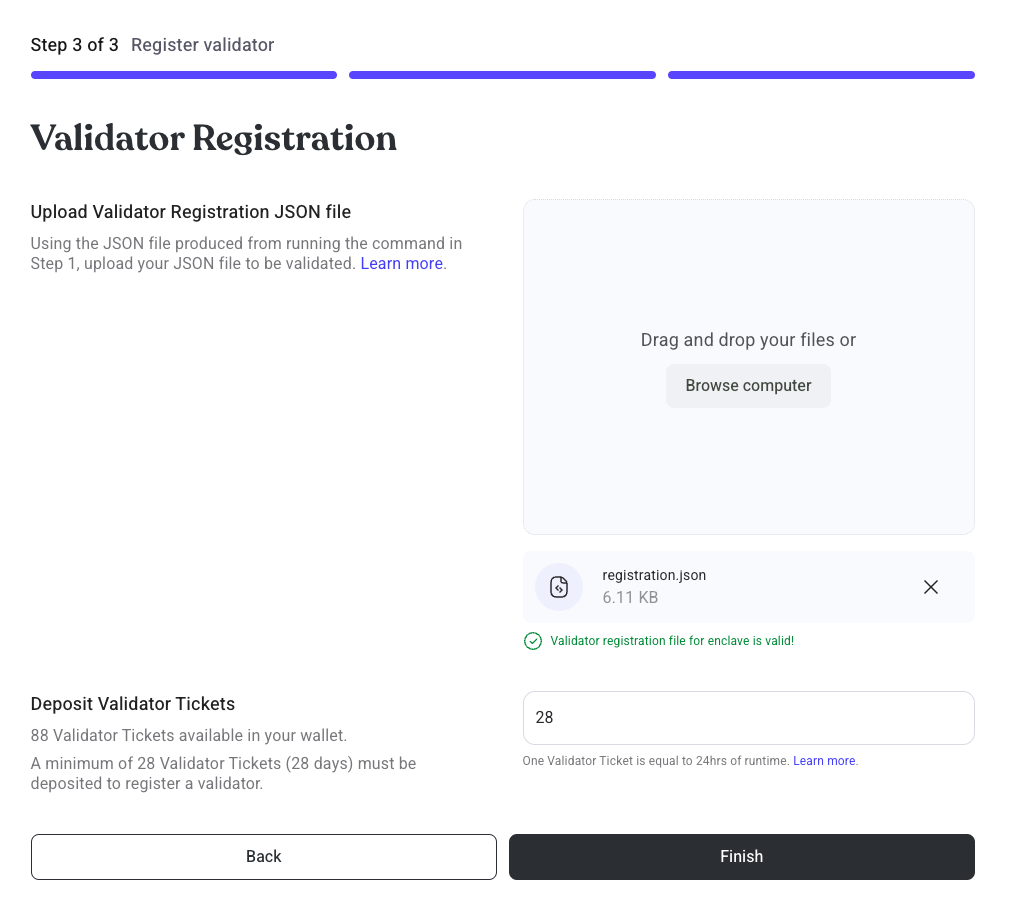
- Drag and drop your registration payload.
- Sign a
Permitmessage to deposit your VTs to the PufferProtocol contract - Sign a
Permitmessage to deposit your pufETH bond to the PufferProtocol contract - Sign the final transaction to register your validator
Step 5: Await Provisioning
The Guardians will provision pending validators when there is 32 ETH of liquidity in the PufferVault.
Invalid registrations will be skipped by the Guardians. The NoOp's bond will be returned but 10 VTs will be penalized to prevent griefing.
Step 6: Prepare your Validator
Import your validator keys to your beacon/validator client.
You can find your generated keystore files in the coral/etc/keys/bls_keys/ directory where each keystore file name is your BLS public key. The contents are encrypted using your supplied password file adhering to ERC-2335.
- Import your validator keys to Nimbus ↗
- Import your validator keys to Teku ↗
- Import your validator keys to Lodestar ↗
- Import your validator keys to Lighthouse ↗
- Import your validator keys to Prysm ↗
Make sure to set your fee_recipient value to your own wallet. Remember, Puffer takes no execution reward fees because of Validator Tickets!
Step 7: View your validators
Proceed to the Dashboard to view the validators registered to your wallet.
Batch Registering Validators
For operators interested in running many Puffer validators a convenience script has been provided to register create keys and register multiple validators in one batch.
-
Clone the PufferPool repo:
git clone https://github.com/PufferFinance/PufferPool.git
cd PufferPool -
Install Foundry
curl -L https://foundry.paradigm.xyz | bash -
Install Coral-CLI
cargo install -f --git https://github.com/PufferFinance/coral.git -
The batch registration script requires a local Eth keystore file to run. You can create a keystore file by importing an existing private key as follows:
cast wallet import -i puffer-test
Enter private key:
Enter password:
`puffer-test` keystore was saved successfully. Address: 0x4D42ABfB6D4bEDaf64dF8BE054676149BDfa224d
This command created a keystore file named puffer-test in the ls ~/.foundry/keystores directory. More instructions on working with Foundry keystores can be found in their docs.
-
Fund the wallet with sufficient VTs, pufETH, and ETH to cover gas. These can be purchased as described above.
-
Inside the PufferPool repo, install the batch registration script dependencies:
forge install -
Edit the
validator-keystore-password.txtfile. This will be the password used to encrypt your validator BLS keystore files. -
Create the
registration-datadirectory for your output registration JSONsmkdir -p registration-data -
Simulate the batch registration script:
- Replace with your RPC URL (either for mainnet or holesky)
- Set the keystore
--accountto the name of your keystore located in~/.foundry/keystores(from step 4) - Set
--senderto the keystore wallet address with your pufETH, VTs, and gas money (from step 4) - Set
--passwordto your keystore password (from step 4)
-
Example Holesky command:
forge script script/GenerateBLSKeysAndRegisterValidators.s.sol:GenerateBLSKeysAndRegisterValidators --rpc-url=https://ethereum-holesky.publicnode.com --account puffer-test -vvv --sender=0x4D42ABfB6D4bEDaf64dF8BE054676149BDfa224d --ffi -
Example Mainnet command:
forge script script/GenerateBLSKeysAndRegisterValidators.s.sol:GenerateBLSKeysAndRegisterValidators --rpc-url=https://eth.llamarpc.com --account puffer-test -vvv --sender=0x4D42ABfB6D4bEDaf64dF8BE054676149BDfa224d --ffi
- Rerun the command with the
--slowand--broadcastflags to send the transaction on chain. Note that the command may take several minutes to run.
-
Example Holesky command:
forge script script/GenerateBLSKeysAndRegisterValidators.s.sol:GenerateBLSKeysAndRegisterValidators --rpc-url=https://ethereum-holesky.publicnode.com --account puffer-test -vvv --sender=0x4D42ABfB6D4bEDaf64dF8BE054676149BDfa224d --ffi --slow --broadcast -
Example Mainnet command:
forge script script/GenerateBLSKeysAndRegisterValidators.s.sol:GenerateBLSKeysAndRegisterValidators --rpc-url=https://eth.llamarpc.com --account puffer-test -vvv --sender=0x4D42ABfB6D4bEDaf64dF8BE054676149BDfa224d --ffi --slow --broadcast
- Your validator keys will be generated locally in the folder:
PufferPool/etc/keys/bls_keys/and can be added to your validator client as described here.
Batch Registering Validators Using Gnosis SAFE
A similar flow exists for operators that use SAFE. The process involves running a convenience script to generate the inputs, then executing a single SAFE transaction to batch register validator keys.
Prereq: Make sure the SAFE multisig wallet is funded with sufficient VTs and pufETH.
-
Clone the puffer-contracts repo:
git clone https://github.com/PufferFinance/puffer-contracts.git
cd puffer-contracts -
Install Contract Dependencies
yarn install -
Install Foundry
curl -L https://foundry.paradigm.xyz | bash -
Install Coral-CLI
cargo install -f --git https://github.com/PufferFinance/coral.git -
Enter the utility-scripts directory
cd utility-scripts -
Edit the
validator-keystore-password.txtfile. This will be the password used to encrypt your validator BLS keystore files. -
Run the script:
forge script script/GenerateBLSKeysAndRegisterValidatorsCalldata.s.sol:GenerateBLSKeysAndRegisterValidatorsCalldata --rpc-url=$RPC_URL -vvv --ffi Two things will happen:
- A new file
safe-registration-file.jsonis created - Your validator keys are created in the
utility-scripts/etc/keys/bls_keysdirectory
cautionRe-running the script will overwrite this
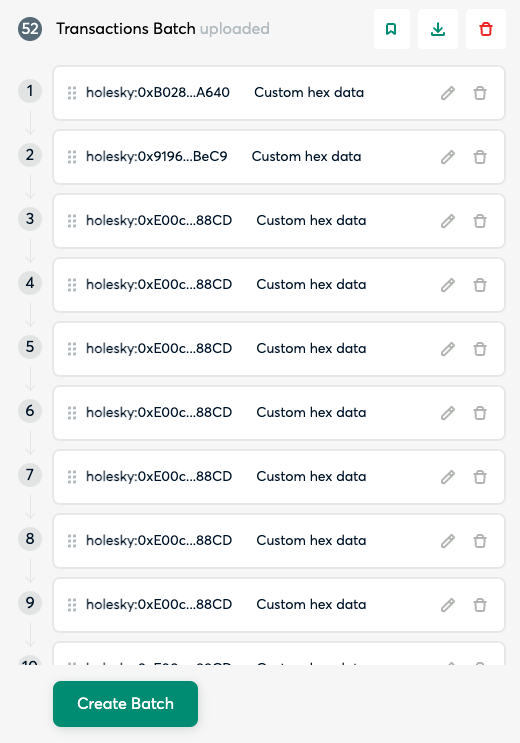
safe-registration-file.jsoncautionTo avoid hitting the gas limit, limit registrations to batches of 50 validators.
- A new file
-
Sign the transaction using the SAFE UI
Craft a transaction using the SAFE Transaction Builder
Upload
safe-registration-file.json>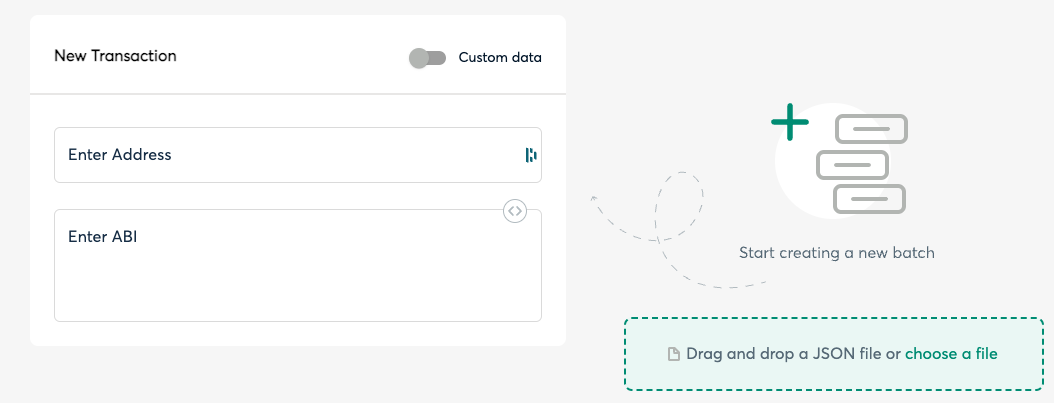
Create a batch
Send the batch and sign the transaction
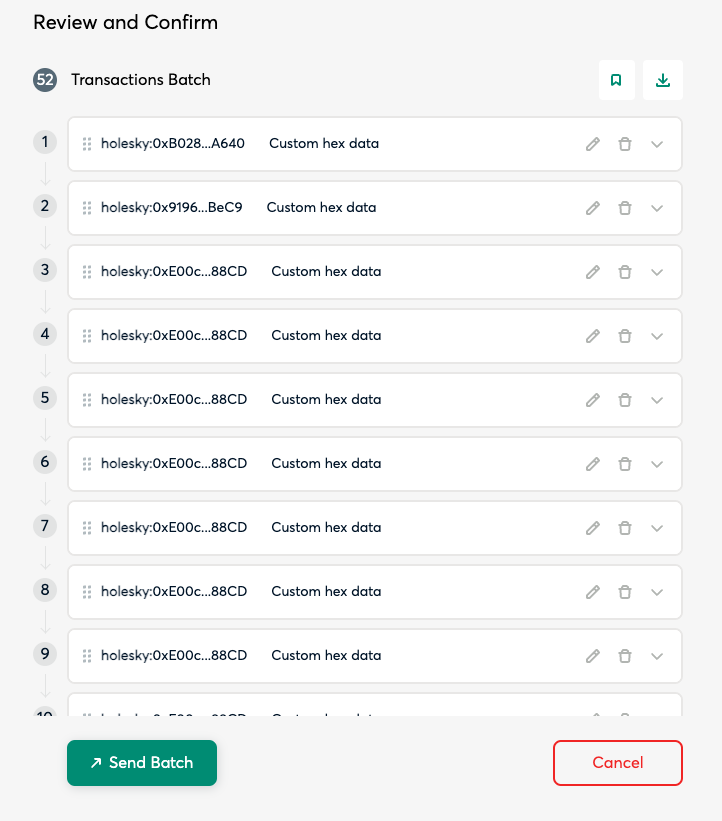
Upon success, your pending validators will be viewable on the Dashboard.
-
Your validator keys will be generated locally in the folder:
utility-scripts/etc/keys/bls_keys/and can be added to your validator client as described here.